
From respiratory issues to musty odor, not to mention structural damage to a home, excessive moisture in the indoor environment can lead to a number of challenges.
This is where dehumidifiers come in handy; they remove excess moisture from the indoor air, allowing homeowners to maintain the perfect humidity level throughout their living space. Whether homeowners are using a whole house or portable dehumidifier, it’s imperative to keep the appliance in top performing condition lest they fail to get the most out of their purchase.
While dehumidifiers require minimal upkeep, they’re not entirely maintenance-free.
To ensure that this appliance performs optimally and lasts longer, it’s imperative to keep up on the maintenance. This includes emptying the tank and cleaning it, vacuuming the dirt off the coils and replacing the vital components when they get worn or damaged.
Table Of Content
Below you will find a Comprehensive Guideline on how to maintain and clean the dehumidifier. This guide only showcases the cleaning and maintenance of the portable dehumidifier however, similar process can be applied to the whole house dehumidifier.
This Guide will apply to most dehumidifier brands such as Danby, Costway, Frigidaire, Afloia, Honeywell, TOSOT, hOmeLabs, Insignia, Whirlpool, Whynter and many others.
- WARNING: Before you begin, it is recommended to unplug your dehumidifier from power source.
Dehumidifier Maintenance
Appropriate use of the dehumidifier coupled with timely replacement of worn and damaged parts will help to keep the equipment running optimally for long, as explained below.
- Inspecting the Coils for Frost or Ice Buildup
If exposed to freezing temperatures below 60 degrees Fahrenheit, the cooling coils inside the dehumidifier can develop frost or ice, reducing the efficiency of these components.
The user should, therefore, inspect the coils by unplugging the machine to determine whether they have ice or frost buildup. Upon detecting these contaminants, user should increase the room’s temperature to keep the coils warmer.

There are some models featuring an auto-defrost function, which goes a long way in reducing the chances of frost or ice buildup.
- Proper Placement of the Equipment
To ensure appropriate air intake and discharge, the dehumidifier needs to be placed at least six inches away from the wall lest it overheats.
This will go a long way in maintaining the machine’s operating efficiency by ensuring that nothing is blocking the airflow in and out of the equipment.
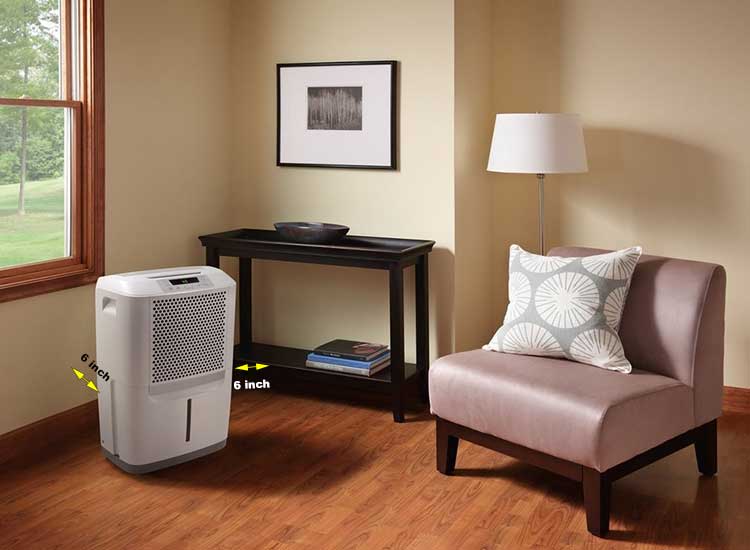
Users also need to keep the windows and doors near the machine closed, which will eliminate the chances of dehumidifying the air leaking from outside, which would lead to elevated energy bills.
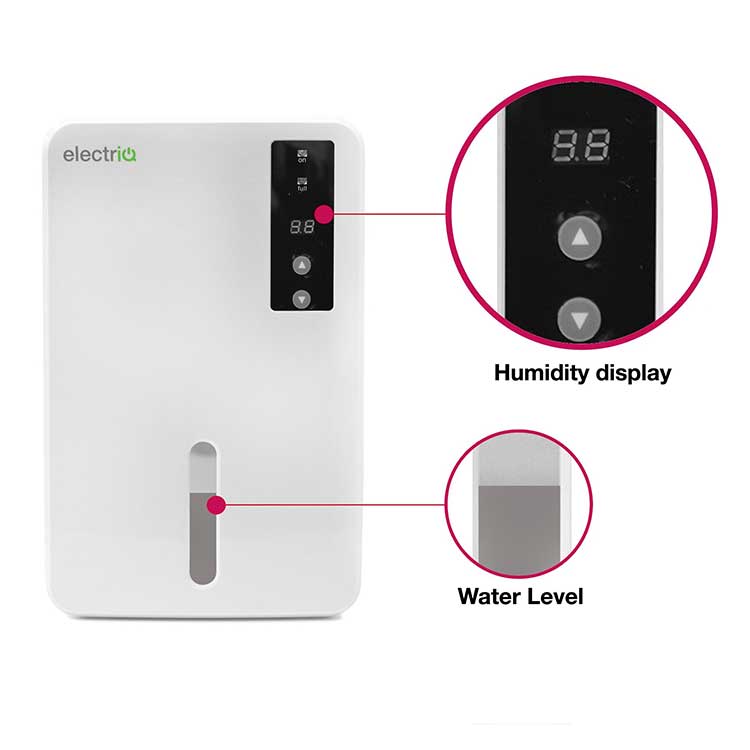
- Regulating the Humidistat
A humidistat is tasked with regulating the level of moisture removed by the dehumidifier from the surrounding air.
Proper adjustment of the humidistat includes refraining from setting the number too low lest the air becomes excessively dry and thus compelling the machine to work too hard to extract humidity from the indoor environment. Excessive removal of moisture leads to a dry, uncomfortable environment in addition to causing damage to the structural materials and furniture in a home.
Besides, having an overworking machine ultimately boils down to elevated energy bills, costing the homeowner extra dollars.
Conversely, setting the humidistat too high would mean ineffective removal of moisture from the indoor air, implying that the homeowner’s humidity issue won’t be fixed.
Setting the device at 50% would be sufficient to maintain a comfortable living environment devoid of mustiness. User can determine the humidity levels in their indoor space by using a hygrometer and subsequently setting their humidistat accordingly.
- Safeguarding the Compressor
User can protect their machine’s compressor from burning out by refraining from turning it off and back on abruptly, which would otherwise cause overheating.
They should, instead, allow at least ten minutes to elapse, which is enough for the pressure inside the system to equalize and thus protect the compressor from damage. Short-cycling the compressor might not only trip the circuit breaker but also lead to reduced efficiency when it comes to moisture removal.
Note: After switching off dehumidifier, wait 10 minutes before you turn it back on.
Some dehumidifiers come with an automatic delayed start function, which goes a long way in protecting the compressor from short-cycle damage.
- Cleaning or Replacing the Filter
Cleaning Schedule: 2x per year
Dehumidifiers come equipped with an air filter that’s tasked with eliminating dust and allergens among other contaminants from the indoor environment. These air filters also come in handy when looking to protect the appliance’s internal components from damage.
Some dehumidifiers filters are permanents and do not require replacement as they can be easily cleaned but others will need replacement, check with the manufacturer owners manual for each dehumidifier type.
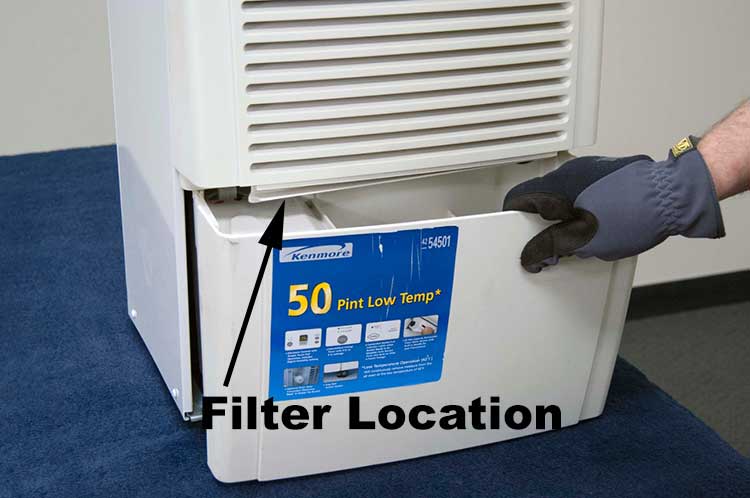
Filters are located on the front and above the water collection bucket. It can be removed after taking out the water collection bucket.
Most dehumidifiers feature an electrostatic air filter, which is often situated in the grill area.
Twice annually, users need to inspect the air filters for possible tear and wear and replace the same when damage is detected. Some filters can also be cleaned to maintain the appliance’s optimal. It’s, however, critical to check the user’s manual to determine the manufacturers recommended cleaning and replacement schedule.
Dehumidifier Cleaning
A dehumidifier is comprised of many parts, which can develop issues or even cause the untimely breakdown of the equipment if the homeowner neglects to clean them properly. Below you will find 2 most important component that require cleaning in a dehumidifier.
- Cleaning the Water Tank
Cleaning Schedule: 1x per month
Contrary to the prevalent misconception, merely emptying the dehumidifier’s tank isn’t sufficient to keep it clean.
The dehumidifier’s condensate/collection tank needs to be cleaned as frequently as possible, preferably once every month. This is accomplished by first powering off and unplugging the unit.
The water tank can be subsequently removed and washed with a combination of warm water and dish detergent. This will help with removing any collected debris and dirt.
Users should also disinfect the tank lest it becomes a breeding ground for mold and mildew.
Before returning the water bucket to the appliance, it’s advisable to rinse and dry it thoroughly. Also, homeowners need to inspect the tank every month to ensure that it’s not blocked, which is especially true if the appliance uses a drain hose.
- Cleaning the Air Intake and Exhaust Grilles
Cleaning Schedule: 1x per year
Dirty grilles can potentially derail the performance of a dehumidifier it can also damage capacitor which leads to dehumidifier not functioning properly. It is, therefore, critical to clean the grilles at least once every season or even more frequently if their condition so demands.
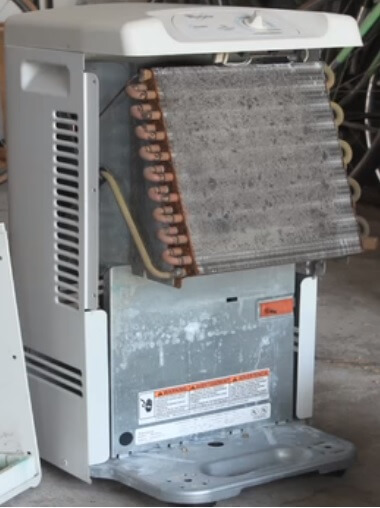
Dehumidifier Front Showing Dirty Compressor Grill
Cleaning the grilles entails using a vacuum brush attachment that comes with the equipment, effectively clearing any blockages caused by debris and dust for optimal performance.
Dehumidifiers serve the all-important purpose of keeping the indoor humidity under control, ensuring that the living environment is more comfortable and healthy. With a fully functional dehumidifier, keeping a home free from musty odor associated with mold and mildew growth becomes child play.
Using the above maintenance and cleaning tips coupled with adhering to the manufacturer’s guidelines will go a long way in keeping the dehumidifier in top performing shape. Proper maintenance of the equipment is also central to ensuring years of continuous use.
Updates: July 16 2019, Reviewed and edited by certified heating and cooling technician.