
Dehumidifiers can be expensive to purchase and operate especially if they’re running for long hours. This is where a homemade dehumidifier can be of real help. This device is easy to build and works as effectively as the electrical dehumidifier.
Read on to discover how homeowners can create a home-made dehumidifier using rock salt, calcium chloride, silica gel, among other readily available items.
Table Of Content
- WARNING: Before you begin make sure to use Personal Protective Equipment (PPE).
Common Signs of High Humidity
- The environment around the house feels stuffy.
- The sweat doesn’t vapor-off easily.
- Mold and mildew infestation will be visible.
- Wooden installations in the house will progressively go worse and release odors.
- Metal installations oxidize and go rusty.

Tools and Material Needed
To begin this easy DIY dehumidifier project, homeowners will need to gather a few basic items that include:
- Electrical drill
- Two buckets—preferably of the same size.
- Small Mesh
- Wire cutters
- A marker pen
- One bag of rock salt o/r calcium chloride o/r silica gel
- Plastic Grill
- Safety Gloves
Step 1: Getting Ideal Buckets
This project begins by selecting the right buckets for the job:
Ideally, the buckets should be able to hold at least 5 gallons of water, but the size can be increased depending on the user’s specific needs.
For instance, if a homeowner wants to dehumidify an area that experiences a lot of moisture such as the basement, they should go for larger buckets and the reverse is true. Also, the buckets should be of the same size as they’ll need to be stacked one on top of the other when setting up this device as shown below.
Step 2: Drilling Holes into One Bucket
After selecting the right bucket, its time to make holes in the buckets:
- Go ahead and create holes at the base of one of the bucket. To accomplish this, place it upside down on a flat surface and subsequently use the hand drill to create about six holes, each one being ¼ inches wide.
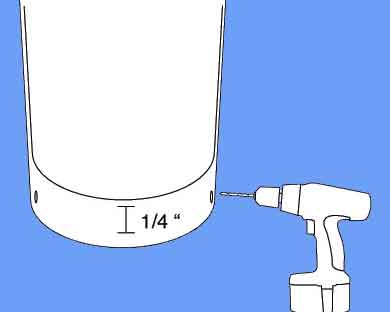

- The task of perforating the bucket should be done carefully and gently as too much force might break the bucket.
- The purpose of these holes is to allow the collected water to drip out of the bucket after the dehumidifier has been set to work. This allows the rock salt crystal to drain out a little, which creates room for more moisture to be absorbed.
- Warning! Gloves and safety goggles should be worn during this step to prevent injuries to the hands and to avoid getting tiny plastic pieces into the eyes.
Step 3: Covering the Perforations with Mesh
While the bucket is still upside down, take the mesh and place it above the holes:
- Subsequently, use the marker pen to trace the perimeter around the base of the bucket. This perimeter should be slightly smaller than that of the base because the wire needs to be put inside the bucket.
- After ensuring that you’ve created a visible trace over the mesh, lift the wire from the bucket and use the wire cutter to cut around the marked region slowly and carefully.
- This step also requires gloves, which will protect the hands from being pricked by the wire.
- Subsequently, place the newly cut wire inside the bucket. The function of this wire is to prevent rock salt from pouring through the holes while also allowing water to exit.
- Ideally, the right kind of mesh is one with tiny holes to ensure that the tiniest crystals of the rock salt don’t drop out.
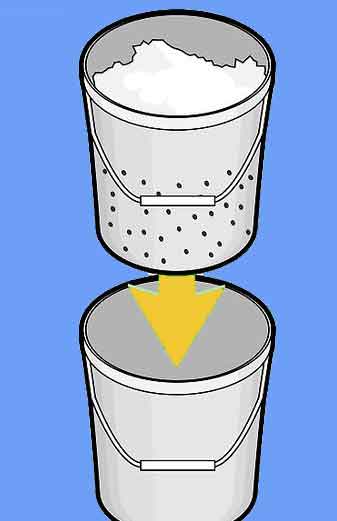
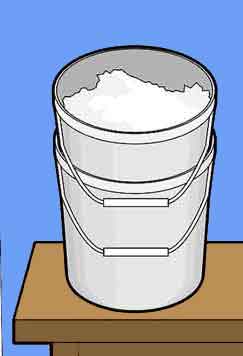
Step 4: Filling the Bucket with Rock Salt and Assembling the Dehumidifier
After fitting the mesh inside the bucket, it’s now time to add the absorbent material. This should be rock salt—the kind that people purchase during winter to melt ice.
- To begin assembling the dehumidifier, take the plastic grill and place it on top of the other bucket (the one without holes) and position the one with rock salt on top. The purpose of the lower bucket is to collect the water that will drip from the rock salt. If you don’t have a plastic grill to create a stand.
- The plastic stand is tasked with the responsibility of preventing the bucket filled with salt from dipping inside the other one. Plastic is the preferred material because it’s sturdy enough and resistant to corrosion.
- If more height is needed for the dehumidifier, you can cut off the base of another bucket (preferably of the same size as the other two) to make it hollow.
- Subsequently, place a grill on the bottom bucket and position the hollow pail on top. Ultimately, you’ll also need another plastic grill to place on the upper part of the hollow bucket before placing the one with the salt on top.

- If you cannot access an extra plastic grill, you can cut the base of the third bucket, but this time you should ensure to leave a margin that’s large enough to hold the upper bucket but not too large to block the drainage perforations. This bucket should be placed upside down over the collection one.
How Does This DIY Dehumidifier Work?
Rock salt is a hygroscopic material, which means that it can effectively absorb moisture from the air, just like an electric dehumidifier.
The device so created is natural, doesn’t contain any toxins and is relatively cheap and easy to acquire, not to mention that it doesn’t need electricity to do its job.
The Mechanism: When rock salt becomes saturated, some water will ultimately drip from the drain holes. The excess water then collects in the bottom bucket. As such, you will need to check in periodically and empty the bottom bucket to create room for more water. Also, you’ll need to change the salt after a certain period of time depending on the amount of moisture in the air. You can also purchase a hygrometer to measure the effectiveness of your DIY devices from time to time.
Other Absorbent Materials
Besides rock salt, you can use a variety of other absorbent materials in the very same manner. Some of these materials include moisture absorber crystals, coffee whitener, and silica.
These materials not only work similar to the rock salt but are also easy to find. You can also use calcium chloride, which is an excellent moisture absorber but has a different working mechanism from the other materials.
While rock salt, silica, and coffee whitener remain the same after absorbing moisture, calcium chloride turns into water. As such, when homeowners choose silica as their ideal material, they should ensure to use large buckets.
Conclusion
A homemade dehumidifier is an ideal device for homeowners who’d like to maintain the right levels of relative humidity but without having to purchase an expensive dehumidifier or increase their power bill. However if you do not wish to go through much effort we have some high efficiency dehumidifier that you can check out here.
This project is incredibly easy, doesn’t take too long and requires cheap materials to construct. What’s more, there’s a variety of absorbent materials that can be used with this homemade device. DIY dehumidifiers are also ideal choices for places like boats, cabins or vacation homes where people don’t visit too often and don’t want to spend too much money on excessive energy bills.